

Running a session in Nanome
Setup is done and users can reach a workspace, in a browser or a headset. This is what to do with it: building the workspace, telling it with scenes, setting permissions, sharing it, and keeping a session comfortable once a group is in there together.
Still setting up hardware? Start with Getting Started.
Plan the session
Step 1 of 8 · What to settle before anyone joins
A session runs on 3 things: how many users join, what they join from, and how much structure is on screen. Settling those first is what separates a session that works from one that crawls.
Find the shape of your session
1 How many users join at once?
Why splitting works
A single workspace holds up while the group fits in one conversation. Past that, split the group and give each part its own workspace built from the same material. Splitting contains mistakes: a change one group makes stops at that group instead of landing in front of every user at once.
It also keeps each session light. A workspace carrying the whole cohort is doing more work than several smaller ones, and the headsets feel it first.
Build the workspace
Step 2 of 8 · Three ways to build a workspace
A workspace holds structures, their representations, scenes, and permissions. Build it in the web app, describe it to a coding agent, or assemble it in a headset. The web app is the recommended route, and everything built there opens anywhere else.
Pick a build path
1 Where is the workspace being built?
More on building
Scenes
Step 3 of 8 · Telling the story with scenes
Scenes are saved views inside a workspace. Instead of showing everything at once and hiding the parts nobody needs yet, each scene shows one step and the group moves through them together.
Building a sequence
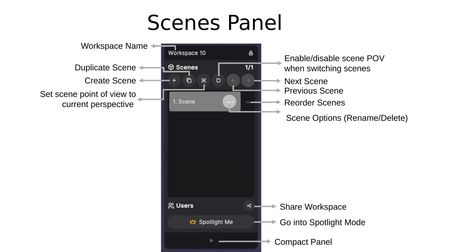
Scenes Panel controls. See Scenes Panel.
- Set the view, then Create Scene. The scene keeps the representations and visibility exactly as they are at that moment.
- Use Set Scene POV so switching to the scene lands every user in the same framing, and leave Enable Scene POV on for the session.
- Duplicate Scene for the next step, change one thing, and keep going. Each scene reveals a little more than the one before it.
- Reorder Scenes by dragging, and rename from Scene Options, so the order matches how the session runs.
What makes a sequence work
Hide what the scene doesn't need More detailLess detail
A scene that shows every atom and then covers them with an opaque surface still renders every atom. Hide the components the scene isn't about with Hide/Show Entry, or clear the view with Hide/Show All and bring back only what belongs.
Name scenes for what they show More detailLess detail
Nanome's own examples are "Active Site Close-up" and "Ligand Binding Comparison". Named scenes let any user in the workspace jump to the right point without being walked there, which matters most when the session splits into groups.
See where each user is More detailLess detail
Each user in a workspace gets a personal color, shown on their name tag and as a dot on whichever scene they're viewing. A glance at the panel says whether the group is together or scattered across scenes.
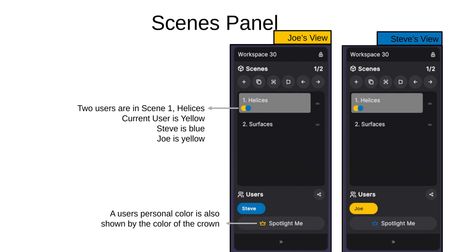
Per-user color dots on each scene. See Scenes Panel.
Keep the sequence short More detailLess detail
Nanome raised the ceiling to 50 scenes per workspace in v2.6. A long sequence built before the first session usually ends up rebuilt after it, so start with the handful of views the discussion needs and add scenes as questions come up.
Scenes in 2 minutes
Keep it comfortable
Step 4 of 8 · How much structure a headset can show
Comfort in a headset tracks frame rate, and frame rate tracks how many atoms are on screen. Nanome publishes the numbers, and they are lower than most first workspaces assume.
Comfort by shown atom count
Nanome rates comfort against frame rate: Comfortable is 72 FPS or better, Moderate is 60 FPS or better, and 30 FPS or less is not recommended.
| Shown atoms | Quest Pro and Quest 2 | Vive Focus 3 | PCVR |
|---|---|---|---|
| 2,500 | Comfortable | Comfortable | Comfortable |
| 5,000 | Moderate | Moderate | Comfortable |
| 10,000 | Not recommended | Moderate | Comfortable |
Shown atom count is what's displayed, not what's loaded. Surfaces, ribbons, labels, and whiteboards each move the number on their own.
Spending the budget well
Hide first
Hide/Show All clears the view, and Hide/Show Entry brings back one component at a time. Everything shown counts, whether or not it's visible behind something else.
Step surfaces down
Surfaces come in 4 densities: Wire, Sheer, Semi, and Opaque. Dropping a density is usually enough, so surfaces rarely have to come off entirely.
One atomistic look at a time
Ball and Stick, Sticks, Wire, and VDW are exclusive per component, so the choice is already made once per component. Split a structure into components to mix looks across a single entry.
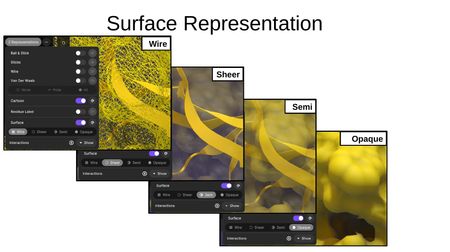
Surface density: Wire, Sheer, Semi, Opaque. See Main Panel.
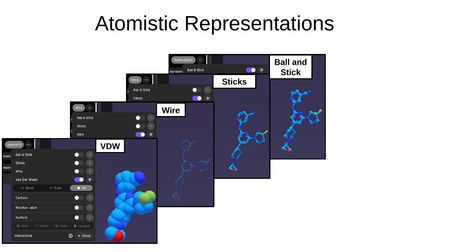
Atomistic representations. See Main Panel.
Permissions
Step 5 of 8 · Deciding who can change what
Permissions are set per workspace, before anyone joins. A Viewer can explore, spotlight, follow, and move through scenes. An Editor can change the workspace itself.
The four levels
Viewer
Sees structures, spotlights their own view, follows others, and moves through scenes. Cannot edit representations or arrange structures.
Editor
Makes all changes, and invites others to view or edit.
Owner
Everything an Editor can do, plus deleting the workspace.
None
No access. The setting for a workspace that should stay private while it is being built.
Setting them
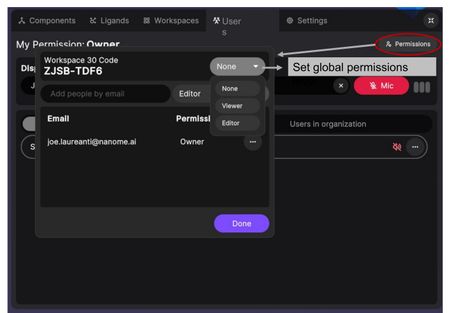
Users tab > Permissions. See Main Panel.
- Open the Users tab and choose Permissions. The dialog shows the workspace code and the global level.
- Set the global level to Viewer for a prepared workspace, or None to close it entirely.
- Add named users by email with their own level. The address has to match exactly, since the field has no autocomplete.
- Change one user later from the (...) menu next to their name, which offers Make Editor and Remove User.
Share the workspace
Step 6 of 8 · Getting the group into the same workspace
A workspace reaches other users 3 ways: the workspace code, an emailed invite, and a direct invitation to anyone in the organization who is already online.
The workspace code
Every workspace has a short code. Any user who enters it joins at whatever global level the workspace is set to, from a browser or a headset.
An emailed invite
Named users get their own permission level by email address, which is how one user edits while the rest stay Viewers.
Straight from the org list
Members of the same organization who are online can be invited into the current workspace, or joined where they already are.
Where the code lives
The workspace code sits at the top of the Permissions dialog in the Users tab, next to the global permission level. It reads as 2 short blocks, like ZJSB-TDF6, and stays with the workspace.
- Set the global level first. A code shared while the workspace is on None lets nobody in.
- Read the code out, paste it into a calendar invite, or send it in chat. Any user with the code joins at the global level.
- In a headset, users enter it under Join Workspace in the Workspaces tab. In a browser, it goes in the same place at app.nanome.ai.
The workspace code, beside the global level.
Named access, and pulling users in
Named access by email
Add people by email in the Permissions dialog gives one address its own level, Editor or Viewer, separate from whatever the code hands out. The address has to match exactly, since the field has no autocomplete.
Named access is what to use when the workspace should stay closed to the rest of the organization, or when one user needs to edit while the rest only watch.
Pulling in a user already online
Users in organization lists the members currently online. The (+) beside a name invites that user into the current workspace, and Join goes the other way, into whichever workspace they are in.
Once a session is running, Load for All takes the whole group to another workspace together, prompting for permissions where a user has none.
Run the session
Step 7 of 8 · Spotlight, follow, and moving the group
Nanome has no designated presenter. Any user can spotlight their view, and any user can follow another, which makes handing the session around a matter of who points where.
Spotlight and follow
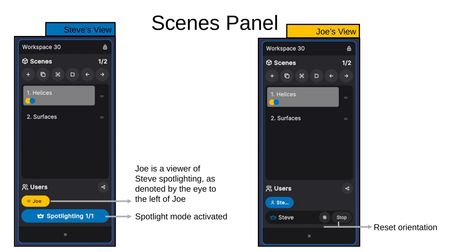
Spotlighting, seen from both sides. See Scenes Panel.
Spotlight Me makes one view the shared view, and every follower sees it with a crown icon and a Stop button to break away. A follower who gets turned around has Reset Orientation to come back.
Any user can spotlight and any user can follow, so the session moves without a designated presenter. Handing it over is a matter of who starts spotlighting next.
Pointers sit relative to the structure, so a pointer at a residue lands on that residue for every user, even those looking from their own angle.
Before the group arrives
Turn Position Molecules off More detailLess detail
Position Molecules moves structures independently of the workspace. The docs state plainly that the spotlight system will not work properly while it's on, so it belongs off for anything collaborative.
Reset the play boundary More detailLess detail
Repositioning the boundary with the Meta Quest button puts each user at a sensible starting point. A user who ends up standing inside the structure can redo it mid-session without leaving the workspace.
Check audio in the Users tab More detailLess detail
The Users tab shows a mic input level, a display name anyone can change, and a per-user menu for muting another user locally. The Wrist Menu carries a mute button for the moments between speaking.
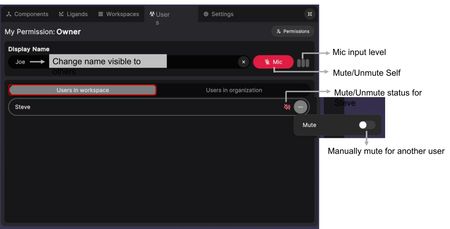
Users tab. See Main Panel.
Move the group, or move alone More detailLess detail
Load for All takes every user in the current workspace to the next one, with a notification that lets them opt out or go immediately. Users without permission on the destination are prompted for one, which is another reason to set permissions before the session. Load moves one user and leaves the rest where they are.
Inviting and following
Troubleshooting
Step 8 of 8 · What to check when something feels wrong
Most live problems come from 4 places: too much on screen, a permission set after the invitation went out, Position Molecules left on, or a network the headsets cannot reach.
The headset feels slow or uncomfortable More detailLess detail
Hide everything, then bring back only what the current scene is about. A Quest is Comfortable at about 2,500 shown atoms and past its budget at 10,000, and atoms hidden behind an opaque surface still count. Dropping a surface from Opaque to Semi or Sheer buys frames without losing the shape.
Following or spotlighting does nothing More detailLess detail
The spotlight system will not work properly while Position Molecules is on, because structures are moving independently of the workspace all users share.
A user can't change anything More detailLess detail
My Permission at the top of the Users tab shows the current level. An Editor or Owner can promote one user from the (...) menu beside their name, which is enough for the moment they need to change something.
Headsets struggle while browsers are fine More detailLess detail
Headsets are often put on a separate network from laptops, and that network can be slower or more restricted. A phone makes a quick test: load the workspace on the headset network, then on the main one, and compare. The network requirements are in the setup guide.
The web app loads to a black screen More detailLess detail
A workspace that reaches full loading and then stays black usually means the browser is rendering without the GPU. In Chrome, turning on hardware acceleration in Settings and checking chrome://gpu for a disabled WebGL line has resolved it for other accounts. Support can confirm the exact settings for a given machine.
Everything slowed down at once More detailLess detail
A workspace holding the whole group is doing more work than several smaller ones. Splitting a large session across workspaces keeps each one light, and keeps one heavy view from reaching every user at once.